We know this is the bit where many people freeze.
Not because measuring for underfloor insulation is especially hard, but because it feels like the moment where you might accidentally order the wrong thing, waste money, or discover that your house was built by someone using “near enough” as a measurement system and their name was ‘Jerry’.
So let’s take the fear out of it.
We are going to walk you through this one simple step at a time. No jargon. No builder-speak. No assuming you already know what a joist is, where to measure, or what to do if your floor plan looks like a rectangle had a disagreement with another rectangle.
You do not need to be handy. You do not need to be mathematical. You just need a tape measure, a bit of paper, and someone calm in your corner. That’s us. We’ll hold your hand through it. You’ve got this!
So let’s get started!!

Measuring your home for underfloor insulation is not hard.
It just feels hard because most people look at the floor, then the tape measure, then the underfloor space, and immediately decide they might need a builder, an architect, a spreadsheet, and possibly a lie down in a dark room with spa music playing in the background.
You do not. You only need two main measurements:
- How much floor you want to insulate?
- How wide the gaps are between your floor joists?
That’s it.
One number tells you how much insulation you need.
The other number tells you which width of insulation will fit.
Let’s go step by step.
What You Need
You will need a tape measure, a piece of paper, a pencil, your phone calculator, and ideally another person who can hold the other end of the tape measure without wandering off.
You do not need to crawl under the whole house to measure the floor area.
You can measure most of it from inside the house, room by room, while standing upright like a normal person. This is much better than trying to measure while lying on your back under the floor with a torch in your teeth.
Step 1: Draw a Very Rough House Plan
This does not need to be beautiful. You are not entering an architecture competition. You are just drawing boxes.
Draw a rough box for each room you want to insulate. Lounge room, bedrooms, hallway, kitchen, dining room, study — whatever sits over the suspended timber floor.
If your house is an odd shape, break it into simple rectangles.
A funny-shaped room is just a few boring rectangles pretending to be complicated.
Step 2: Measure Each Room
Now measure the length and width of each room.
Measure wall to wall.
Do not subtract furniture, cupboards, the couch, the bed, the dining table, the dog bed, the toy basket, or the pile of shoes near the front door.
The floor still exists underneath all of those things.
Write the measurements on your rough plan.
For example:
Bedroom: 3 metres x 4 metres
Lounge room: 5 metres x 4 metres
Hallway: 1 metre x 6 metres
Nice and simple.
Step 3: Work Out the Area of Each Room
This is the only maths bit.
For each room, multiply the length by the width.
Length x width = square metres.
So if a bedroom is 3 metres long and 4 metres wide:
3 x 4 = 12 square metres.
That bedroom needs about 12 square metres of insulation.
If your lounge room is 5 metres by 4 metres:
5 x 4 = 20 square metres.
If your hallway is 1 metre by 6 metres:
1 x 6 = 6 square metres.
Write each answer next to the room.
Step 4: Add the Rooms Together
Once you have the square metres for each room, add them together.
For example:
Bedroom 1: 12 square metres
Bedroom 2: 12 square metres
Lounge room: 20 square metres
Hallway: 6 square metres
Kitchen: 15 square metres
Total: 65 square metres.
That means you need enough underfloor insulation to cover about 65 square metres.
This is your floor area.
You are doing well. No one has cried.
Step 5: Do Not Measure the Whole Block
This is where people sometimes go wrong, your land, the roof or the outside walls. You are just measuring the floor area you want to insulate.
If part of your home is on a concrete slab (like under a bathroom), do not include that section. Underfloor insulation is for accessible suspended floors, usually timber floors with a crawl space underneath.
If part of the house has no access underneath, make a note of that too. It may not be possible to insulate that section from below.
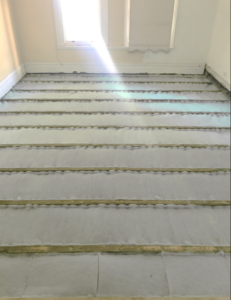
Step 6: Check Your Joist Spacing
Now we need the second measurement.
This one does need a look under the floor. You are checking the gap between the joists.
The joists are the timber beams that hold up your floor. The insulation sits between them, so we need to know how wide that space is.
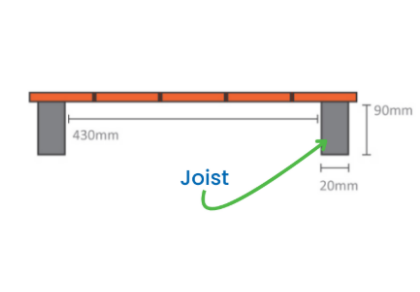
What is a Joist?
A joist is simply the timber that runs directly underneath your floorboards.
The measurement you need is the distance between one joist and another. In this case – it is 430mm wide
You are not measuring the joist itself. You are measuring the open gap between one joist and the next joist.
Think of it like measuring the space where the insulation will go.
Take your tape measure and measure from the inside edge of one joist to the inside edge of the next joist.
That gap might be around 430mm, 450mm, or something else.
Measure a few gaps in different places. Some homes like to keep things interesting, because apparently straight lines and consistent spacing were optional on some building days.
Write down the most common gap size.
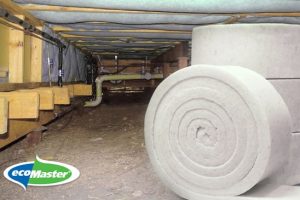
Step 7: Add 20mm to Your Joist Spacing
Now that you have measured the space between your joists, there is one more little trick.
Add 20mm to that measurement.
This is because the insulation does not just sit in the gap and hope for the best. It needs to be slightly wider than the space so it can be tucked and stapled into the sides of the joists.
Think of it like tucking a blanket around a mattress. If the blanket is exactly the same width as the mattress, there is nothing to tuck in. It just sits there looking hopeful. Underfloor insulation is the same. It needs a little extra material on each side so it can be held firmly in place.
So, if the space between your joists measures 430mm, you allow for 450mm of insulation width.
If the space between your joists measures 410mm, you allow for 430mm of insulation width.
That extra 20mm gives you about 10mm on each side to staple into the joists. It also helps when the joist spacing is not perfectly even, which is very common in real homes. Houses are not built like Lego. Sometimes the spacing changes a little as you move along the floor.
So the rule is:
Measure the clear space between the joists, then add 20mm.
That is the width you are trying to allow for when choosing or cutting your underfloor insulation.
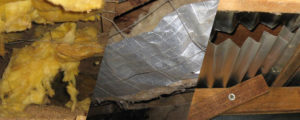
Step 8: Look for Problem Areas
While you are checking the joists, have a quick look for anything that might make the job harder.
If this is new news for you, can we recommend you have a read of page – Is My Home Suitable for Underfloor Insulation.
You are looking for things like very low clearance, lots of pipes, lots of wires, damp patches, rubble, stored junk, termite damage, or areas where you simply cannot get through safely.
You do not need to solve all of this right now. This helps you work out whether the whole area can be insulated, or whether some sections need to be skipped.
Step 9: Round Up, Not Down
Underfloor insulation needs to be cut and fitted. There will be joins, trimming, odd corners, and little areas that behave badly.
So do not order exactly 65 square metres for a 65 square metre job and expect the universe to behave perfectly.
The universe does not behave perfectly, especially under houses.
Once you know your total floor area, check the pack coverage under the specifications tab of the product you have chosen and round up to the next full pack or roll.
If you are between two quantities, always round up.
Running out at the end is deeply annoying, which is to be avoid where possible.
Step 10: What to Send Us if You Need Help
If you are not sure what to order, send us the useful information.
The useful information is:
- Your total floor area in square metres.
- Your joist gap measurement.
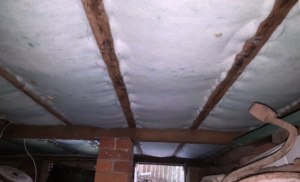
- A few photos of the underfloor area.
- Any notes about low access, damp areas, pipes, wiring or sections you cannot reach.
That gives us something practical to work with.
A message that says, “I have a normal house, how much do I need?” is harder, because houses are rarely normal once you start looking underneath them.
Let’s Work Throught a Simple Example
Let’s say you measure:
Lounge room: 5m x 4m = 20 square metres
Bedroom 1: 3m x 4m = 12 square metres
Bedroom 2: 3m x 3m = 9 square metres
Hallway: 1m x 6m = 6 square metres
Kitchen: 4m x 3m = 12 square metres
Total: 59 square metres.
Then you check under the floor and measure the gap between the joists. Most of the gaps are around 430mm.
So now you know two important things:
You need insulation for about 59 square metres.
You need a width that suits your joist spacing.
That is the whole point of measuring.
Final Tip
Do not overthink the first measurement.
Start with the rooms. Measure the length. Measure the width. Multiply them together. Add them up. Then check the joist gaps. That is enough to get you moving.
And if you get stuck, take photos. Underfloor photos are not glamorous, but they are incredibly useful. They help us see what you are seeing, without making you describe “that timber bit next to the other timber bit near the pipe thingy.”
Although, to be fair, we do understand that language too.