The true expense of underfloor insulation isn’t just measured in dollars but also in the effort required for installation. Investing in high-quality underfloor insulation and ensuring it’s installed meticulously is essential, as it impacts the overall effectiveness and longevity of the insulation. Choosing superior products can seem costlier upfront but pays dividends in the long term by providing enduring comfort and energy savings.
This makes the initial investment and the installation process crucial — not just a one-time expense but a foundation for a lifetime of comfort in your home. Ensuring the insulation is perfectly installed maximizes its efficiency, reducing ongoing energy costs and enhancing the living environment sustainably for years to come.

Tools You'll Need
- LED Headlamp: Essential for lighting up dark spaces under your house.
- Tarps: Use tarps cut into long strips to keep the insulation clean and prevent dirt from falling into your eyes.
- Safety Glasses: Protect your eyes from dirt and dust. Opt for models that prevent fogging. (Some installers use swimming goggles)
- Stapler and Staples: A reliable cordless stapler and 10mm galvanized staples are recommended. Ensure the stapler is always ready with power for safety reasons.
- You DON’T need over-alls or breathing apparatus as polyester underfloor insulation is non-toxic, non-allergenic and non-irritant.
Installation Steps for a flawless Underfloor experience
(1) Preparation: Begin by cleaning the underfloor area to ensure it’s free from debris. This preparation will make the installation process smoother, safer and a lot more comfortable.
(2) Loading Insulation: Load sufficient insulation material under the subfloor to cover the area you plan to insulate. Arrange the material so it’s easily accessible as you move along.
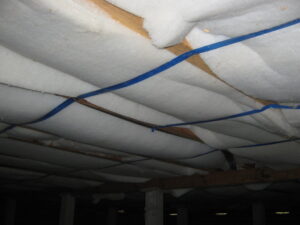
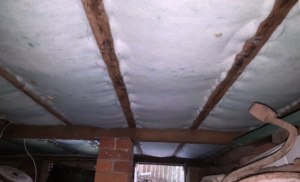
(3) Stapling Insulation: Start by lifting the insulation against the underside of the floorboards and stapling it to the joists. Ensure that there is no gap between the floorboards and the insulation. Staples are to be placed about every 10 centimetres to secure the insulation effectively on both sides of the joists.
(4) Managing Wires and Obstacles: Be cautious of electrical wiring and other obstacles. When you encounter wires along the side of joists, avoid stapling under the wires. Instead, adjust the insulation material to ensure wires remain accessible and safe from accidental stapling.
(5) Fitting Insulation in Irregular Spaces: Utilize the turn and tear method for joist spaces that don’t align perfectly with the width of your insulation. Measure the required insulation, tear it off, and staple it in place, ensuring there are no gaps between sections.
Common Problems and Troubleshooting
Sagging Insulation: Ensure the insulation is securely fastened to the joists. Check periodically and re-staple areas that may begin to sag.
Moisture Issues: If installing in areas prone to dampness, ensure that there is adequate ventilation is maintained to prevent mold and mildew of your timbers. Polyester insulation will not carry mould, but that does not mean it is to be used as protection against moisture.
Electrical Hazards: Always ensure the power is on if using a DOUBLE INSULATED ELECTRIC STAPLER OR A CORDLESS STAPLER, to notice any accidental stapling through wires immediately. For added safety, ensure that there is an RCD (Residual Current Device) installed.
By following these guidelines and using the proper tools, you can efficiently and safely install polyester insulation under your floor. This installation will improve your home’s thermal efficiency as well as enhance your comfort throughout the year. Remember to always prioritize safety, especially when working near electrical installations.